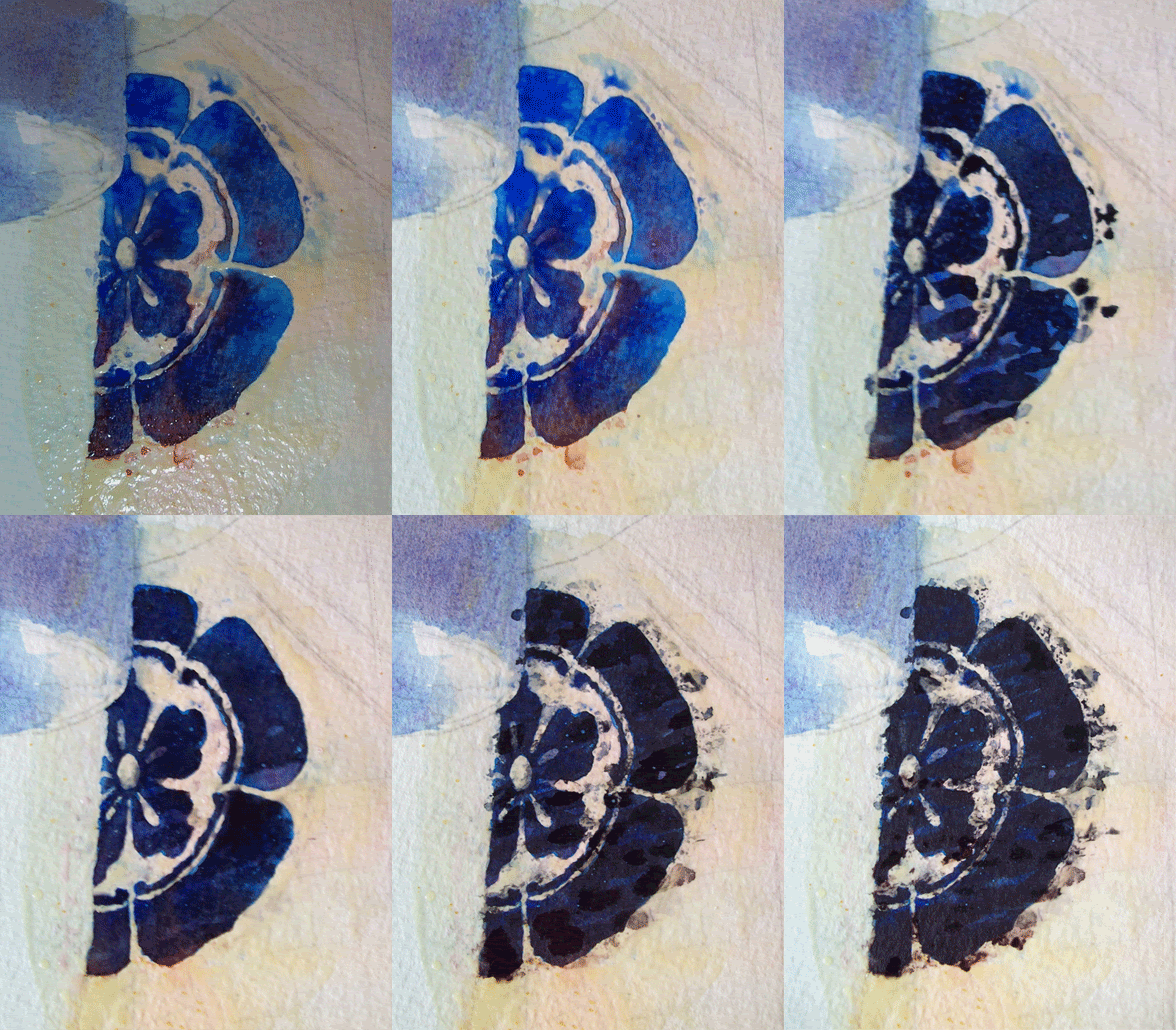
1, 2 & 3.- Masked the shape and added some blue and red as a richer base, it dried lighter as often and mute but the variation was there.
4, 5.- The first layer of black/blue black/red added and dried, I wanted to keep some of the shape of the paper of the lantern and play with textures and edges.
6.- Sprayed some very diluted blue and red acrylic paints which was the main reason to mask around the print in the first place, the mixes of black run a bit, enough to make me loose the contrast and edges when it dried as seen in step 7.
8, 9.- Plan B, if spraying the acrylic don't work maybe applying the back mixed with blue and with red acrylic paint instead of watercolor would work, waited for it to dry and removed the masking. It doesn't show as much of the underpainting as I wanted at first but it's a corner so I don't mind not having it as interesting in there as in other areas of the image.
10.- The main reason of trying the spray and acrylic was to avoid the bleeding of lamp black which seem to love running around, yet I put a brushtroke over it and it still bled a bit, not to much but it's a concern, 11 and 12 are the acrylic palette and the watercolor palette, I think I mixed enough acrylic paint to make the black permanent.
So what's gone wrong? maybe the sprayed acrylic was too diluted and didn't work and what's bleeding is the color from some areas that can have remained uncovered when I applied the color in the last steps?
Right now I have 2 choices, to paint the lanterns' paper first or the symbols first, I was decided to paint the symbols first and once fixated to paint all the rest, but if those blacks still bleed I'll have problems, in the other hand I could finish all the white of the lanterns first and then the symbols but then I wouldn't be able to use the masking fluid 'cos it's already lifting the colors of the subtle washes, hmmmmmm, gotta ponder a bit more about it.
The good thing is that I'm liking the kind of variation that I'll be able to get in those black shapes and still have them black which was one of my goals for this one

Here's a gif of the step by step, just because:

Links to the whole of the WIP: step 1, step 2, step 3, step 4, step 5, step 6, step 7, step 8, step 9, step 10, step 11, step 12, step 13, step 14


3 comments:
Teresa, I'm wondering why you didn't or don't just do the blackish design last? Or, if you must do it earlier and then worry about bleeding, here's something I found in the latest Dick Blick catalog = Schmincke AQUA Mediums
It's called FIX and it says you mix it w/watercolor instead of water or apply over a wash + it waterproofs the surface, allowing for successive washes that remain distinct. Does that sound like something you could use? 60 ml for $12.56, catalog number H02100-1003
LOL don't even get me started about Schmincke aqua fix, do you remember that thread I opened at WetC that went crazy? well, that's exactly the product I was asking about, after some comments I was sure a mix with acrylic would do the same effect but yet here I am, with a bleeding area lol! maybe I did it wrong.
You're right Rhonda, I should just do the blacks in the last step, but I wanted to mask around them and play freely throwing paint from left to right all the way without too much care :(
I understand, Teresa, but if you mask the black shapes and then splatter, throw paint, do whatever you need, then unmask and paint the blacks - would that do the same thing? Yes, I think the FIX might work better than the thinned acrylic but still unsure how you get the FIX or the acrylic on without disturbing the paint underneath = bleeding, blurring - maybe a very light touch with a soft brush?
Post a Comment